Last updated on April 2nd, 2023 at 10:17 pm
Are you tired of struggling with stiff steering and lackluster performance on the water? Look no further! In this article, we’ll be diving into foolproof Hynautic steering bleeding instructions that will leave you with smoother turns and better overall performance. Whether you’re a seasoned sailor or a first-time boat owner, these simple steps will have you feeling like a pro in no time.
How To Bleed Hynautic Steering System
Step 1. Fill & Pressurize The System
To bleed Hynautic steering, use a light viscosity hydraulic oil that meets the aircraft hydraulic fluid spec Mil-H-5606. Locate and loosen the two screws on the relief valve, then remove the hex plug on top of the reservoir and fill it with oil. Pressurize the system to 40-45psi, then bleed the air out of the (P) port and (S) starboard lines at the highest helm. Disconnect the cylinder and bleed both ends by backing off the socket head cap screw bleeders or cracking open the fitting connections. Verify that the reservoir is at least 3/4 full and the gauge reads between 40-45psi.
Step 2. Purge The Air From The System
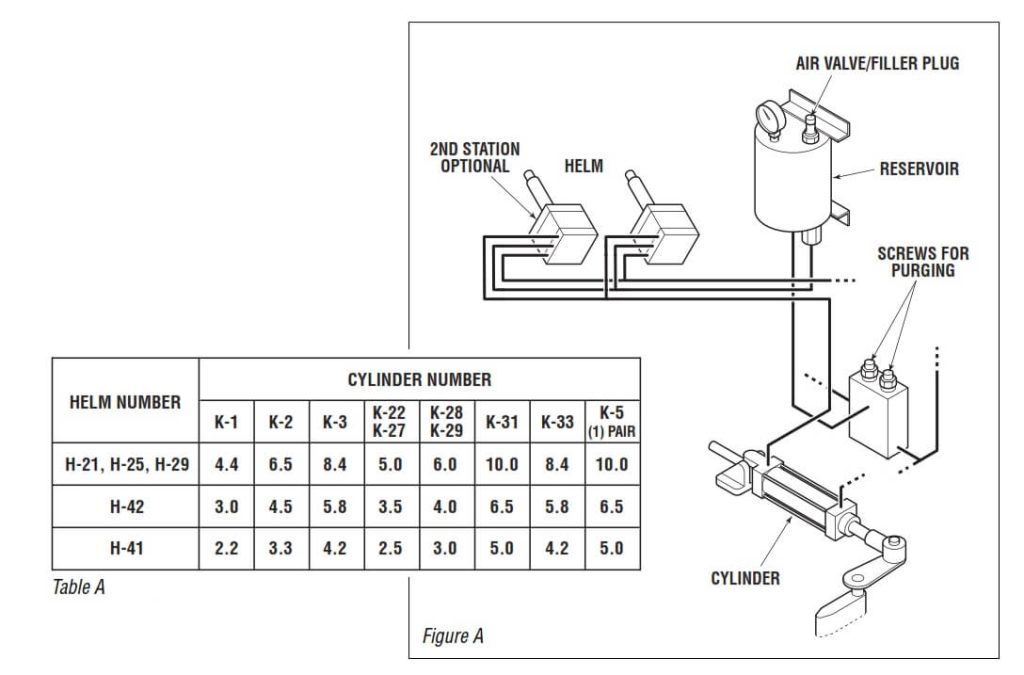
To remove air-infiltrated oil from the hydraulic lines and replace it with solid oil, use a sequential process of operating the helm(s) and autopilot. The number of wheel turns specified in Table 1 should be followed, with an increase of 2 turns for every extra foot of tubing length beyond 20 feet. Begin at the highest helm and turn slowly 60 times in one direction, then repeat at each successively lower helm and autopilot.
Note: These instructions explain how to purge air from a hydraulic autopilot. To do this, you must set a course on the autopilot to the same direction you are steering the helm(s), then run it for 1 to 2 minutes. Next, you must crack the bleeders at the cylinder and allow the air to bleed out. After this, check the reservoir pressure and oil level, refill if needed, and turn the wheel 60 times in the opposite direction. Repeat this process at each helm and autopilot. Finally, close the two relief valve screws with pinned hex nuts by turning clockwise and snug with a wrench.
Caution: To prevent loss of steering, it is important to close the relief valve screws properly. Begin by turning the helm in one direction until a hardover is felt, then open the bleeder or crack the fitting at the cylinder to release air. Repeat the process by turning the helm in the opposite direction until another hardover is felt, and bleed until solid oil appears. Verify a complete purge by rotating the helm to achieve the corresponding number of turns hardover to hardover in Table 1 of the official Hynautic bleeding procedure manual. To test the relief valve and system integrity, turn past hardover at each helm position, forcing oil over the relief valve. Finally, secure the cylinder to the mounting structure and check the fluid level and pressure in the reservoir, leaving it 1/2 to 2/3 full and at 20-30psi.
Step 3. Check The System
It is recommended to perform a final purge and system check after 24 hours to detect leaks and remove any remaining small bubbles. Observe the system for oil leaks and the reservoir gauge for pressure loss.
Note: To account for a common 5psi pressure fluctuation on hydraulic autopilot systems that are exposed to a temperature change of 20°F or more, the first step is to open the relief valve screws. Starting at the upper helm, the helm should be turned 40 turns in one direction, and this should be repeated at each successively lower helm. Then, the helm(s) should be turned in the opposite direction in the same manner. Next, close the relief valve screws and snug them with a wrench. It is important to verify that the appropriate number of turns hardover to hardover has been achieved and to recheck the oil level (which should be between 1/2 and 2/3 full) and reservoir pressure (which should be between 20-30psi).
Note: These instructions are about disconnecting a line from the system. Before starting, the air pressure within the reservoir needs to be exhausted, and the filler plug should be removed. The relief valve screws need to be opened to relieve all pressure in the lines. After finishing the work, the lines should be reconnected and the system should be repurged of air.
Final Words
In conclusion, maintaining a hydraulic steering system is crucial to ensure the safety and performance of your vessel. By following the manufacturer’s instructions and performing regular checks, you can prevent potential malfunctions and keep your system in top condition.
Remember to always be vigilant for any signs of leaks or pressure loss, and don’t hesitate to seek professional help if you encounter any issues.
With proper care and attention, your hydraulic steering system can provide years of smooth and reliable operation, allowing you to enjoy your boating experience to the fullest.
Check out our Guide to Hynautic Steering Troubleshooting.