
Last updated on July 22nd, 2019 at 08:27 am
Undoubtedly, the most popular boat hydraulic steering systems for boats powered by outboard motors are made by SeaStar Solutions, which was previously branded as Teleflex. While SeaStar makes very good quality products, sometimes after years of heavy use, the helms of their units may begin to leak. This is where a SeaStar helm seal kit or rebuild kit can help repair the issue.
Skip To:
SeaStar Helm Models
There several different SeaStar helm models to choose from. The four most durable and commonly used models are BayStar Helm HH4314-3, SeaStar Helm HH5271-3, SeaStar Pro Helm HH5770-3, and SeaStar Helm HH6541-3.
| SeaStar Helm Model | Check Price | |
|---|---|---|
 | BayStar Helm HH4314-3 |
|
 | SeaStar Helm HH5271-3 |
|
 | SeaStar Pro Helm HH5770-3 |
|
 | SeaStar Helm HH6541-3 |
|

Boat Hydraulic Steering Helm Leaks
If your SeaStar helm begins to leak hydraulic steering fluid from the front seal of the boat’s steering-wheel shaft, then you likely will be able to quickly and easily repair it without removing the entire helm. This is so long as the helm unit is installed in the more standardized front-mount configuration, or if it is installed with a back-plate kit, or else installed with a round-bezel kit.
On the other hand, if the SeaStar helm is installed totally behind the boat’s dash, then you will need to fully remove the helm to complete this project. But don’t worry, this project can easily be handled by most owners. Of course, taking it to a shop is also always an option.
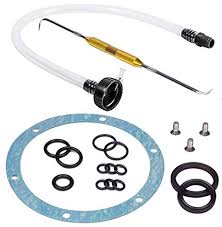
Now, prior to getting started, you will need to order several items. If your pump was made after 1990, then you should order SeaStar Helm Service Kit HP6032. This helm kit comes with a nyloc nut used for the boat steering wheel, a quad ring seal, a new top plate used to cover the seal, and a Woodruff key. After you have replaced the helm, you will also have to purge, or bleed, the lines of air, which requires that you add SeaStar hydraulic fluid to the steering system. The easiest way to do this is to use a filler kit.
Project Skill Level: 1/5
Time To Complete: Approximately 2 hours
Tools and Supplies Needed
* SeaStar Solutions Helm Service Kit HP6032
* SeaStar hydraulic fluid
* SeaStar Steering Fill Kit HA5438
* Torque wrench
* Socket wrench and deep socket set
* Phillips-head screwdriver
* Phillips-head socket (for use with the torque wrench)
* Marine grease
* 4″ steering wheel puller
* Container and old shop rags (to capture spilled hydraulic fluid and to clean)
* Box or open-end wrench set
SeaStar Helm Seal Kit
Several of the items listed above can be conveniently found in a SeaStar helm seal kit. We found this great SeaStar helm seal kit, which comes with the filler hose, to be a great deal. Just be sure to check that this helm seal kit works with your particular helm model.
Repair And Replace Leaking Hydraulic Steering Fluid Instructions
Pro Tip: Do not bang on the steering wheel and do not use a punch and hammer on the center of the steering shaft, because doing so will likely damage critical components of the SeaStar helm or the boat’s steering wheel.
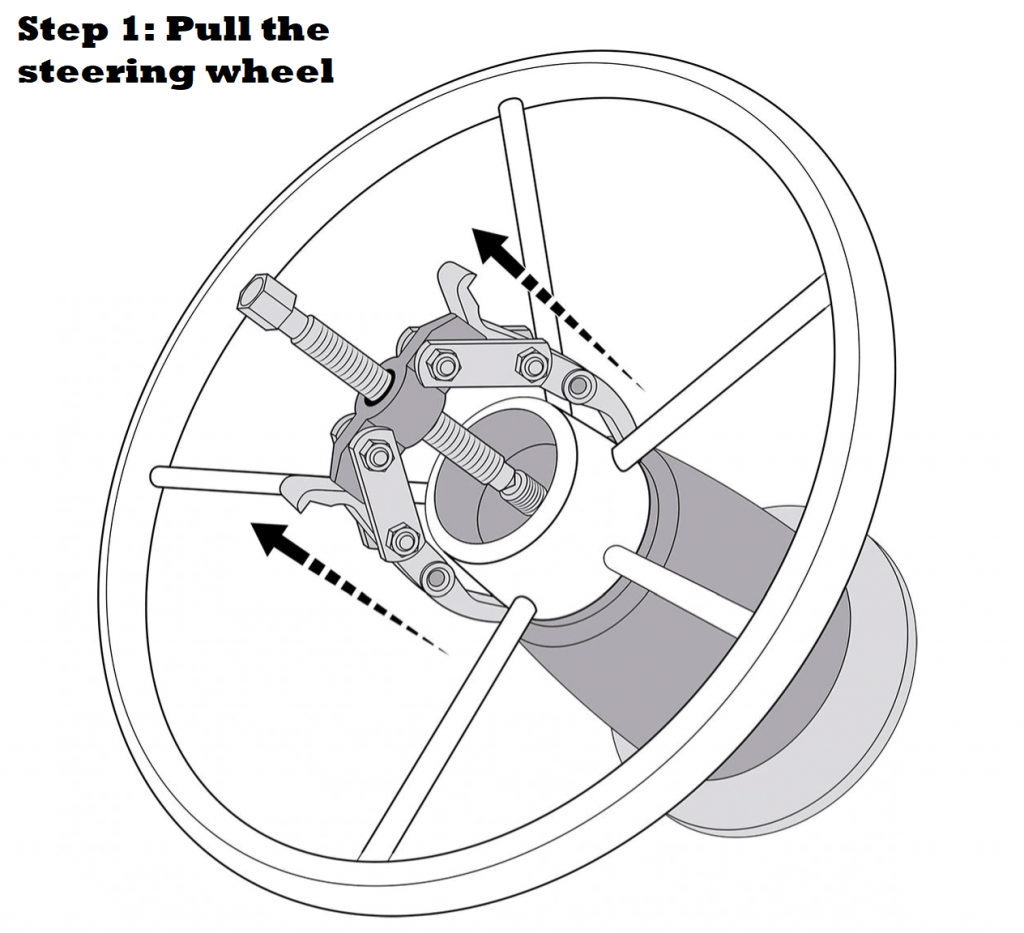
Step 1: Pull the Steering Wheel
You may likely have to remove the hub plate which conceals the nut which is holding the boat’s steering wheel into place. While holding the wheel, loosen and remove the nyloc nut by using a long socket wrench. Often times, due to corrosion, the steering wheel will be very difficult to remove. If you have this problem, use a steering wheel puller like the K-Tool International (model KTI-70304) to remove the steering wheel. Next, remove the Woodruff key that is in the steering shaft.
Step 2: Removing the Old Seal
Remove the three screws which hold the top plate in place with a Phillips screwdriver. Since the service kit does not come with new screws, be sure to save the old screws. When you next remove the top plate and quad ring seal, use a container to catch any hydraulic steering fluid which might drain from the helm. If you have to pry loose the quad ring seal, use a use a small wooden or plastic pick to do so.
Step 3: Installing the New Seal
After you have wiped off the steering shaft with your shop rag, you will need to lightly lubricate the shaft using a little fresh hydraulic steering fluid. Be sure to lightly lubricate the new quad ring seal, as well. Next, slide it into position over the steering shaft at the front of the helm. Be certain that the seal is fully seated in the groove at the face of the helm. When you install the new top plate, be certain that the CE mark is placed exactly at the center of the top. Insert and tighten down the 3 Phillips-head screws that you removed earlier to a torque of 6 to 9 inch-pounds.
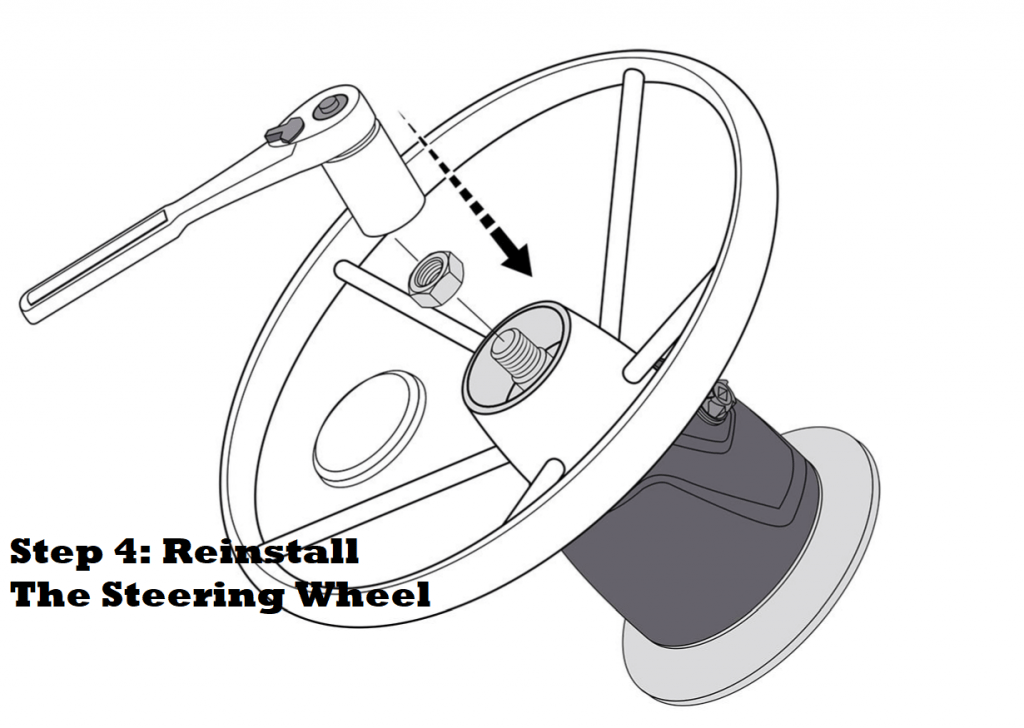
Step 4: Reinstalling the Steering Wheel
Using some marine grease, lubricate the steering shaft. Insert the new Woodruff key that came with the kit into the groove in the shaft. Gently turn the steering shaft until the groove is facing upward. Doing so will help so that the Woodruff key doesn’t fall out. Now, align Woodruff key with the slot in the wheel hub as you gently slide the steering wheel into position over the steering shaft. Thread the new nyloc nut on slowly. While holding the steering wheel in place, use a torque wrench to slowly tighten the nyloc nut to 150 inch-pounds. You can now install the hub plate on the wheel.
Step 5: Re-Fill and Bleed the Hydraulic Steering System
Once you have the new seal and the steering wheel re-installed, go ahead and remove the cap found on top of the SeaStar helm pump. Now, utilizing the SeaStar filler kit, add one quart of SeaStar hydraulic fluid to fill the steering system. For this next part, you will need the assistance of a buddy in order to properly bleed the hydraulic system of air; one of you should be near the helm while the other one should be at the hydraulic steering cylinder found back near the boat motor with a wrench in order to open and close the system bleeder valves. Simply follow these steps:
- Turn the boat wheel hard to the starboard side.
- On that side, open the bleeder nipple that is located on the steering cylinder.
- Turn the boat wheel to the opposite side (port), thus pumping fluid and air out of the bleeder fitting.
- As soon as you see an air-free stream, then you can close the bleeder nipple.
- Keep turning the steering wheel to the port side until the boat’s motor comes hard-over.
- Open up the port-side bleeder nipple which is located on the steering cylinder.
- Turn the boat wheel to the opposite side (starboard), thus pumping fluid and air out of the bleeder fitting.
- As soon as you see an air-free stream, then you can close the bleeder nipple.

SeaStar Helm Rebuild Kit
If your steering system needs more than a simple fix or refill, you can find a complete SeaStar helm rebuild kit. Using a SeaStar helm rebuild kit to rebuild your steering system is a bit more complicated, as you might imagine, so we will address that in a future post. For now, here’s a video showing a complete rebuild.
Manuals
For your convenience, here are the installation instructions from the manufacturer. These are the SeaStar helm manuals.
SeaStar Helm Manuals – Front Mount Installation
SeaStar Helm Manuals – Classic Tilt Installation